Article Courtesy of Bobby Owsinski https://bobbyowsinskiblog.com/2018/12/19/home-studio-listening-environment/
Probably the single most important area that gets overlooked in most home studios is the listening environment. While it’s possible that you can get lucky with a balanced, even sound by just setting up a couple of nearfield monitors in your room without thinking much about it, usually that’s not the case. The average garage, living room, or bedroom was never intended as a listening space and has little in the way of acoustic treatment as a result. This excerpt from Bobby’s Mixing Engineer’s Handbook provides some quick, easy and inexpensive ways to improve your listening environment.
Acoustically treating your room to smooth out some of the frequency imbalances can be cheaper and easier than you think, but that subject is beyond the scope of this book. You can read more on how to do that in Bobby’s Studio Builder’s Handbook (Alfred Publishing). That said, here are a number of very simple things you can do to effectively improve your acoustic environment relatively cheaply and easily.
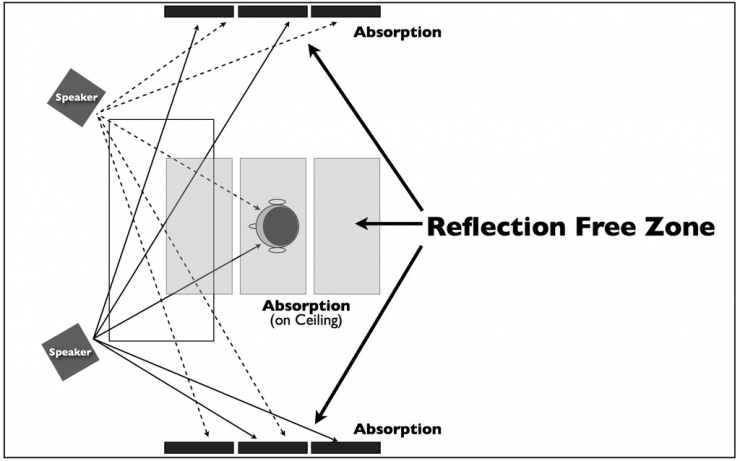
The Reflection Free Zone
The most critical part of creating a pleasing listening environment is creating what’s known as a Reflection-Free Zone (or RFZ). This is an area around the listening position that tames the first reflections from the output of the speakers so they don’t randomly bounce around the room (see the graphic above).
The concept is easy to implement. Sit in the listening position and have a helper move a mirror over the side wall. Everywhere that you can see the reflection of either speaker in the mirror requires acoustic treatment to tame the reflections. Repeat on the opposite wall and on the ceiling and you’ve defined your RFZ. It’s a good idea to treat a larger area of the wall than you identify with the mirror so you’ll be free to move around a little without leaving the Reflection Free Zone. Although it’s more difficult to slide a mirror around on the ceiling, one way is to attach a hand mirror to a broomstick with rubber bands. Just by treating this area, you will improve your room by a surprising amount.
Acoustic Panels
Acoustic panels are the major way that reflections are kept from bouncing around the room when creating an RFZ. If your walls are hard (meaning there’s no absorption), these reflections are going to cancel out certain frequencies from the direct sound of the monitors because of the standing waves, causing a number of unwelcome dips and peaks in the room’s frequency response.
You can think of an acoustic panel as a very large picture frame that has sound absorbing material inside instead of a picture. Although you could permanently attach the sound absorbing material to the wall (like most commercial studios do), using a sound panel allows you to move it as needed and even take it with you if you move. Although you can build your own acoustic panels for very little money, they can now be purchased from a variety of sources online like Primacoustic, GIK Acoustics, ATS Acoustics and many more.
Overcoming Potential Acoustic Problems
Here are a few things to avoid if you can help it. These may seem like small fixes, but in some cases they can make a dramatic difference in what you hear.
These are simple yet easy tips that can easily be applied to almost any listening environment.
You can read more from The Mixing Engineer’s Handbook and Bobby’s other books on the excerpt section of bobbyowsinski.com.